Friday, August 10, 2012

Gift Box with Flower

      Hello everyone.  Today I wanted to share with you a paper flower I learned to make.  It is a paper Chrysanthemum which I cased from Tanya Bell.  I used the new 2012-2013 InColor Summer Starfruit.  I attached it to a gift box which I made using another InColor Gumball Green, and a piece of Designer Series Paper from the Birds of A Feather paper pack. 


Here's a picture tutorial on how to make the flower:
Step 1:  Punch out three 2 3/8" Scallop Circles, and one 1 3/4" Scallop Circle. 


Step 2:  (Optional) Ink edges of scallop circles with your choice of ink color.

Step 3:  Using Paper Snips, cut towards center between every other scallop, aiming towards opposite "valley". Do not cut all the way to center, just close.


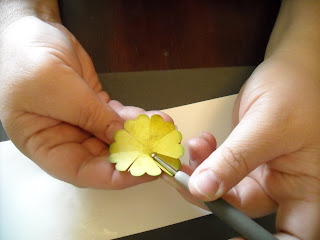
Step 4:  Using a spray bottle, spray each scallop circle with water, about 2-3 times.  Then use either the end of a stylus or the handle of a small paint brush to curl up each section of scallops.  The handle of a paint brush works best.  Curl each section up on all pieces except one of the large scallop circles.  Instead curl this one down, or in the opposite direction. (The direction matters only if you inked edges)  This becomes the bottom layer of your flower.  You may want to use your heat tool to dry each scallop before layering.


 Step 5:  Use Stampin' Dimensionals between the layers and start assembling flower, starting with the large scallop which you curled down.  Before adding the small scallop on top, make sure it is completely dry then add your embellishment to center, such as a brad or pearls, etc.


Step 6:  (Optional)  You may choose to spritz your flower with Champagne Mist shimmer paint.  In a small spritzing bottle combine (mostly) rubbing alcohol and few drops of Shimmer Paint.  Shake bottle well and spray.  Then let dry before attaching to your project.  Below is another flower I made using a brad and spritzed with Champagne Mist Shimmer Paint. 


Thursday, August 9, 2012

Enjoying Life Outside My Comfort Zone

     Once again I was encouraged to step outside my comfort zone.  My friend insisted I join her in a scrapbook layout challenge.  That may not seem like suck a big deal to some, but I'm not really a big fan of 12 x 12 layouts.  I only do them when I'm preparing for a Stampin' Up! scrapbook workshop.  And even then I feel so out of my element that I stress over it for weeks.  I never ever do them for myself, for personal use that is.  Until today.....  My friend insisted that I do one, and would not take no for an answer.  I finally gave in, but not without some serious kickin' and screamin'.  
     What a blessing my friend was to me today.  Not only did I enjoy working on the 2 page layout, but I also enjoyed the outcome.

       The Designer Series Paperpack I used is called Comfort Cafe'(#126898) and the cardstock colors I used were Soft Suede, Cajun Craze, Summer Starfruit, and Midnight Muse.  Then I also used the Scallop Edge Border Punch (#119882) and Summer Starfruit 3/8" Stitched Satin Ribbon (#126846).  On either end of the pages I embossed with VersaMark and Clear Embossing Powder to give it a watermark look.  The stamp set I used is Flowering Flourishes (#126365). 
     Please post a comment and share when stepping outside your comfort zone produced something rewarding.

Wednesday, August 8, 2012

More 3 x 3 Cards

     Here are some more 3 x 3 cards.  I love doing these little cards because they are so easy and quick to make.  They are great for using as thank you cards or when you need a quick card to go along with a gift.  I used the new stamp set, Affection Collection (#127946) from the Holiday Catalog, which is a really neat stamp set.  I love all 8 images in this set.  For the envelopes I used Designer Series Paper from the Twitterpated paper pack (#125406). 
     By the way, the stamp set I got absolutely free when I attended Stampin' Up! Convention this July.  Just one of the many free items I received.  It's great to be a Demonstrator, not only do you get a discount on all your orders, but you also earn a lot of FREE STUFF!!
     Contact me if you are interested in hostessing your own party to earn free product or if you'd like information on becoming a demonstrator.  


Wednesday, August 1, 2012

Mini Thank You Cards

      Normally when I make cards I stick to the standard 4 1/4" x 5 1/2".  I rarely do any other size.  I guess you could say I'm stuck in a rut or maybe just stuck in my comfort zone.  I recently heard a great quote that says..."Life begins at the end of your comfort zone."  So, I have determined to step out at least once a week and try something different.  So here's what I came up with.  Gotta take baby steps first though, or I'll scare myself back into my miserable rut.

 
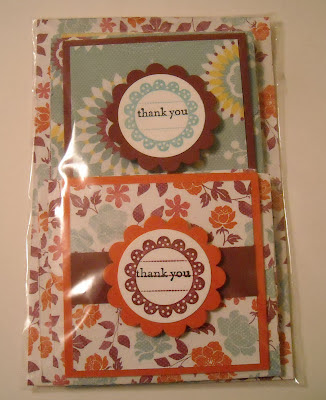
     This is a set of four 3 x 3 Thank You cards with matching envelopes I made today.  I used some of Stampin' Up's new Designer Series Paper (DSP) called Floral District (pg. 163, #126919).  The cardstock I used is Baja Breeze, Daffodil Delight, Rich Razzleberry, and Tangerine Tango.  The stamp set I used is from a Hostess Set out of the new Holiday Catalog called Mixed Medley (pg. 39, #128057), and then I stamped the Thank You from Teeny Tiny Wishes (pg. 133, 115370).  
     Speaking of the New Holiday Catalog... you have to check it out.  There are some wonderful stamp sets and fun embellishments.  Also some new Framelits to go along with coordinating stamp sets.  Too cool!!!!  And of course I want one of everything!  Well, maybe two of some things.  But, I have to keep calm and pace myself.  
     The Holiday Catalog is available from August 1,2012 - January 2, 2013.  If you would like your own copy I'd be happy to give you one.  And if you'd be interested in having a private holiday class for you and your friends just let me know.  It's a great way to earn free product. 
     Remember to step out of your comfort zone this week and try something different.